Setting up your new ANKER Nebula Astro projector can be very easy, only takes you three steps to get the device ready.

1. Placement
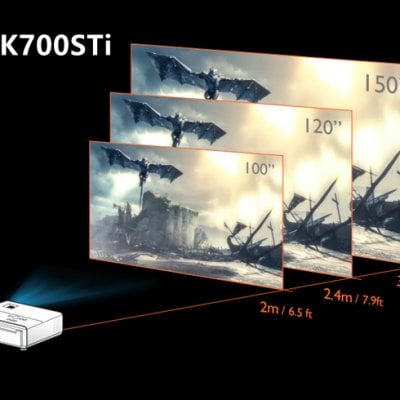
Place Nebula Astro on a stable, flat surface in front of the projection surface. For the best results, the projection surface should be white and flat. The distance between Nebula Astro and the projection surface must be a minimum of 0.58 meters (23 inches) and a maximum of 3.08 meters (121 inches) to get a projection image between 20 and 100 inches.
2. Prepare the Remote Control
The remote control comes with two AAA batteries.
① Slide down to open the battery compartment.
② To replace the batteries, slide to open the battery compartment, insert new batteries (matching the polarity (+/-) indicated), and close the battery compartment.
3. Get Started
① For first-time use, fully charge the built-in battery using the provided cable and adapter.
② Hold for 2 seconds on the projector to turn it on.
③ Turn the device towards a suitable projection surface or wall.
④ Rotate the knob to adjust the focus.
⑤ For first-time use, follow the on-screen instructions to complete the basic setup.
Related posts:
Why Anker Nebula Projector Remote Doesn’t Work?
How to Connect Anker Nebula Capsule Projector to Bluetooth Speaker?
How to Adjust the Projection Size of Anker Nebula Capsule Projector?
How to Install Apps on Anker Nebula Apollo Projector?
How to Update the Firmware of Anker Nebula Projector?
What Does Different Colors of LED Indicator on ANKER Nebula Astro Projector Mean?